7 minutes
How to Host a Static Site in Azure for (Almost) Nothing
After experiencing another compromise on some of the WordPress websites I host in early 2023, I decided it was finally time to move my own website (www.pjlewis.com , where you’re reading this) from WordPress to a static site generator, such as Hugo , Jekyll or Gatsby . I had used Hugo a fair bit at AWS to build some training websites, and had tinkered with Jekyll before. After exploring the current options for static site generators, I decided to stick with Hugo due to the experience I already had with it.
The process of migrating my WordPress website to Hugo was pretty straightforward, thanks to the WordPress to Hugo exporter plugin by Cyrill Schumacher , which made exporting my pages really easy. But that migration isn’t the purpose of this blog post.
Instead, I want to talk about how I went about hosting my new Hugo site - i.e. where and how I hosted the files generated by hugo build - as this was a learning curve for me.
As part of the migration, I wanted to address a few things:
- Page-load time should be as fast as possible
- Hosting costs should be as low as possible
- Build and deploy of new versions/pages/posts should be automatic
Switching Over
First of all, I needed to find somewhere to host the files output by Hugo. Now that I’m working for Microsoft, this should definitely be Azure, so I went looking at Azure Blob storage. Out-of-the-box, Azure storage accounts come with static website hosting capabilities, and all you need to do is enable the capability, and optionally define an index document and an error document path:
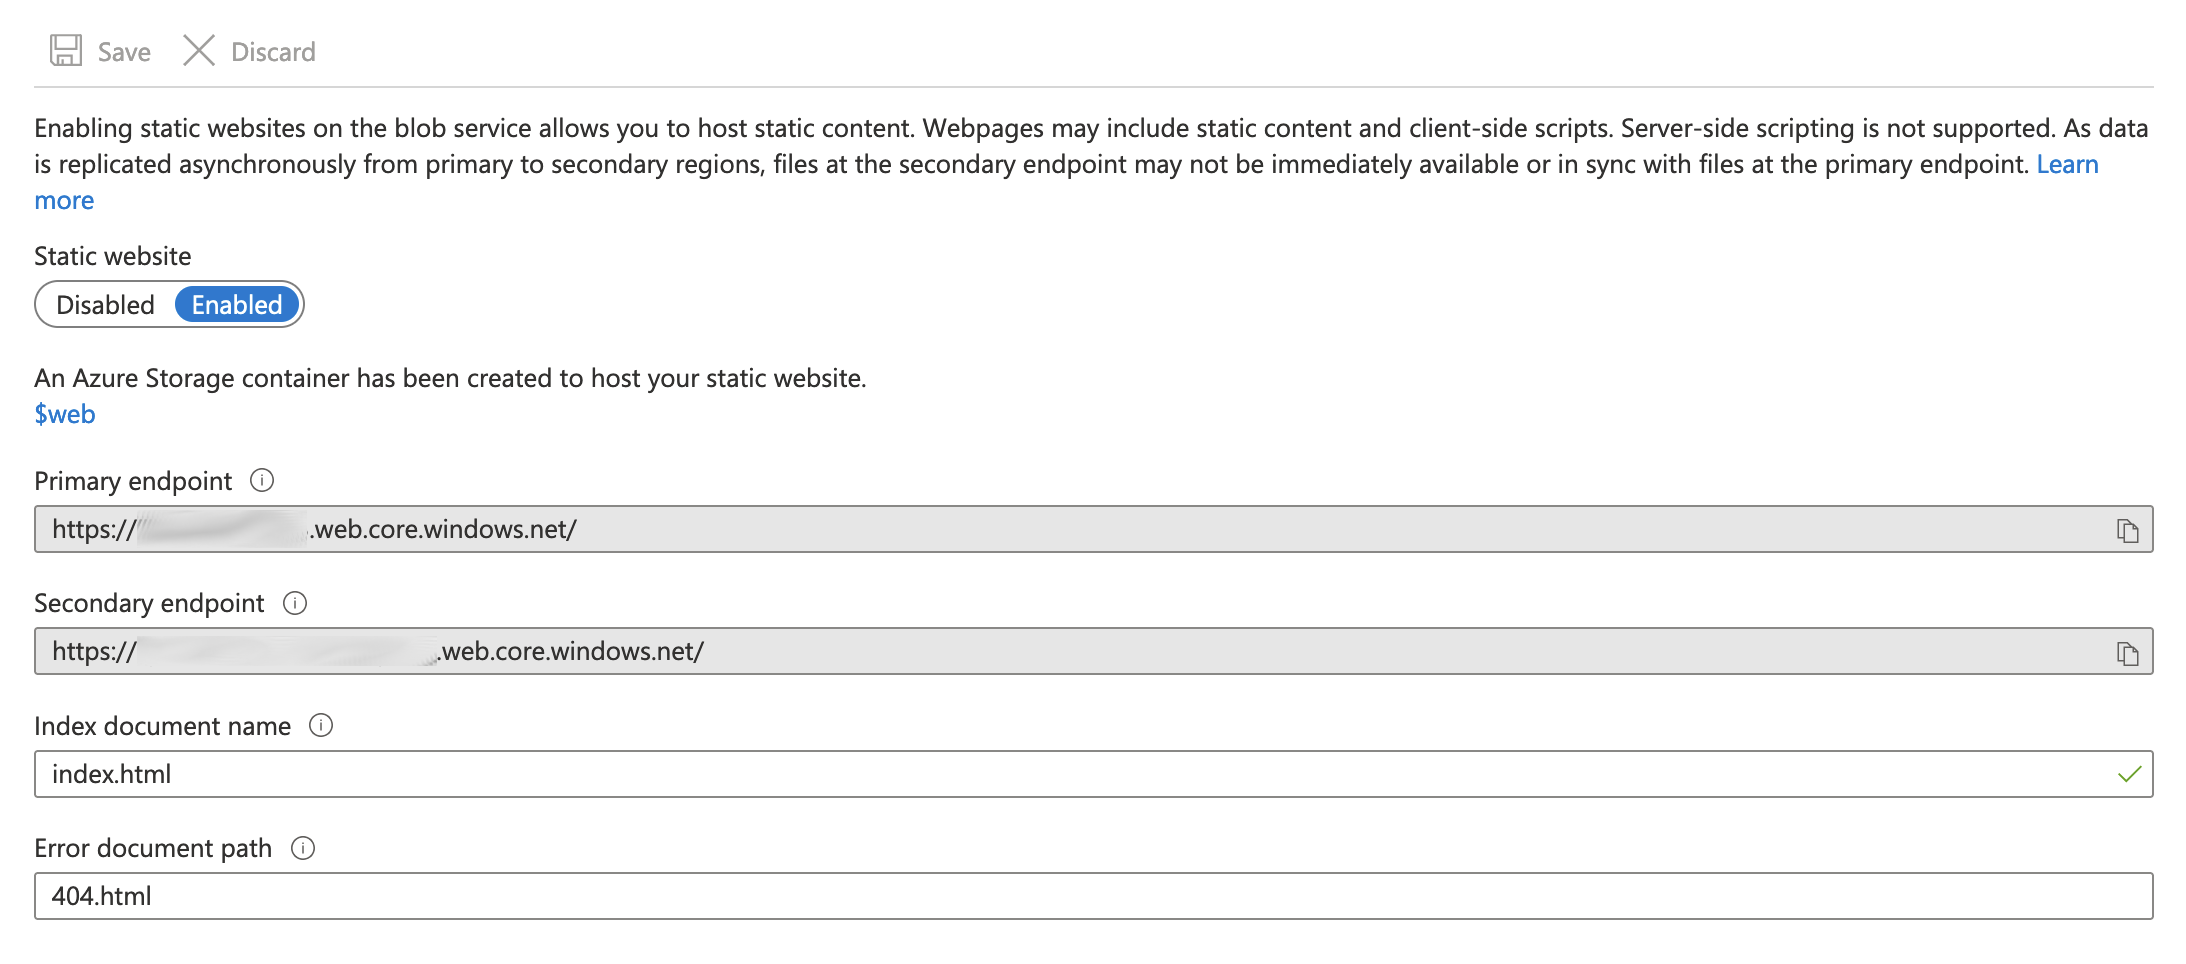
After that, you simply upload your static website files to the $web container in your storage account, and your website will be available to view on the provided https://*.web.core.windows.net URL.
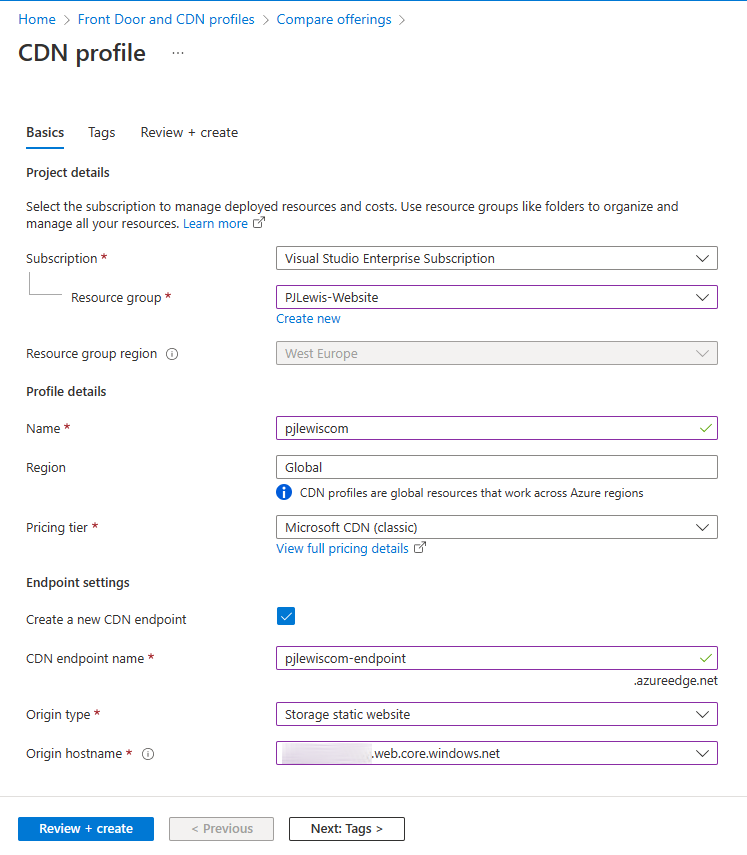
Of course, I wanted to host my website behind my own custom domain, and I also wanted to use a CDN to keep the page-load times as fast as possible. I created an Azure Front Door and CDN profile, configured the endpoint name, origin type and host name, and a few minutes later the CDN was ready and available. (I selected “Azure Front Door (classic)” to avoid any monthly fees.)
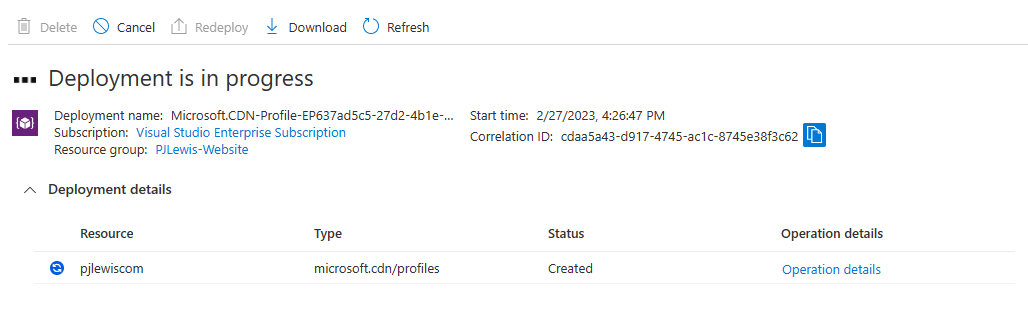
One thing I really like about the Azure portal is the “Deployment progress” page when you’re deploying resources, giving you an overview of everything that’s happening, the current status…
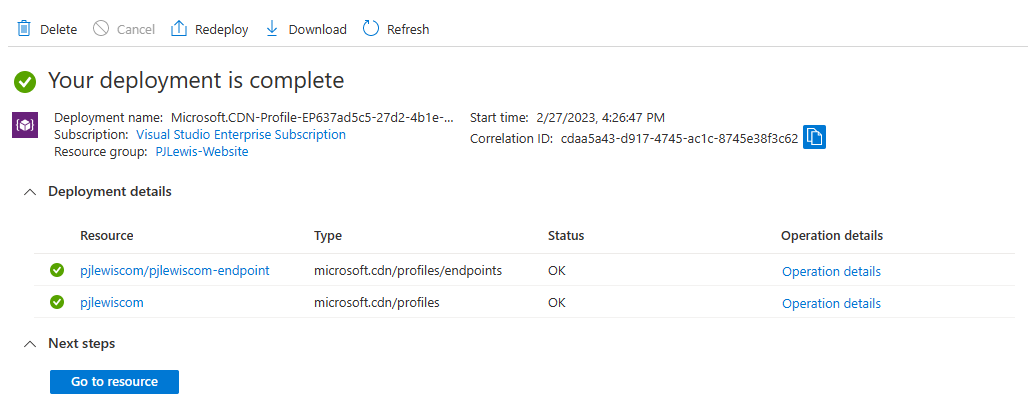
…and a link to “Go to resource” when everything’s finished. It’s really slick.
After creating the CDN profile and endpoint, it was time to configure the custom domain. I used a temporary hostname so I could test everything was working as expected before switching my live website over. Setting this up is easy - you add a CNAME DNS record pointing to your endpoint’s *.azureedge.net* address, and then add it under Custom domains. You can then enable “Custom domain HTTPS” which will create and deploy Azure-managed certificates for your custom domain names.
With Azure CDN serving my new website from my temporary custom domain name, I thought I was pretty much ready to go, and the only thing I wanted to sort before switching the live website over was automating builds and deployments. GitHub Actions looked like a good candidate for this, and after a bit of research I found that there were pre-built Actions that I could use to check out my code , build my Hugo website , and deploy it to Azure Blob Storage . After a couple of attempts (and a bit of Googling!) I figured out a working Actions workflow definition:
name: Hugo deploy
on:
  push:
    branches: [ "main" ]
  # Allows you to run this workflow manually from the Actions tab
  workflow_dispatch:

jobs:
  build:
    runs-on: ubuntu-latest
    steps:
      # Checks-out your repository under $GITHUB_WORKSPACE, so your job can access it
      - name: Checkout the code
        uses: actions/checkout@v3
        with:
          submodules: recursive

      # Builds the Hugo website using action by Jake Jarvis
      - name: Build the Hugo website
        uses: jakejarvis/hugo-build-action@v0.107.0

      # Deploys the website to Azure Blog Storage
      - name: Deploy the website to Azure blob storage
        uses: tibor19/static-website-deploy@v3
        with:
          enabled-static-website: 'true'
          folder: 'public'
          connection-string: ${{ secrets.AZURE_STORAGE_CONNECTION_STRING }}
As you can see, you need to define a repository secret called $AZURE_STORAGE_CONNECTION_STRING, which is where we store the storage account access key, so GitHub can push files into the $web container.
With all the infrastructure in place and the website building successfully in GitHub Actions, I thought I was ready to make the final few configuration changes and transition my live website, but I ended running into a couple more challenges.
The Challenges
First, when you’re adding custom domains to Azure CDN, you need to create a CNAME DNS record before Azure will add the configuration to your CDN endpoint; this means you have to make changes to your live URLs as part of the setup process, and I couldn’t really find a way around this.
Because registering the custom domain and enabling and configuring HTTPS on that custom domain are two separate steps, I did notice 5-10 minutes of disruption while I was making these changes, during which time my website either failed to load, or the browser received certificate errors due to domain name mismatches in the cert. This wasn’t a big deal for me, but could be a problem for others if availability is a concern.
The second issue I found was that I couldn’t map my apex domain record to the Azure CDN endpoint, as I was hosting my DNS records in AWS Route 53. So I had to migrate my DNS hosting from Route 53 to Azure DNS, which was really straightforward thanks to this blog post by Berislav Babic. Once the zone had migrated across, I was able to create the apex record and register it into the Azure CDN endpoint.
Thirdly, it turns out that you can no longer enable “Custom domain HTTPS” for apex domains: you have to bring your own certificate instead. When I was hosting my website in AWS, I relied on the AWS-managed certificates provided as part of Amazon CloudFront, so I don’t have my own SSL certificate for my apex zone. For now, I’ve left HTTPS disabled on the apex zone and added an endpoint rule to redirect all HTTP to HTTPS (as well as apex to www), so now even if any visitors navigate to http://pjlewis.com
, they’ll end up viewing my site on https://www.pjlewis.com
.

With these issues (mostly) taken care of, my website has now been migrated from WordPress to Hugo, and from AWS to Azure. The migration itself took only a few hours, most of which was spent waiting for DNS changes to propagate.
One of the features I’ve been really impressed with in Azure is the functionality and flexibility of Resource Groups. There’s nothing similar in AWS, and as an AWS customer you’d have to do a lot of work yourself to replicate some of the features you get out of the box with Resource Groups. Cost Analysis is a great example of this: Resource Groups provide a container within your subscription that can act as a “cost boundary”, so you can easily analyse the cost of particular projects within your Azure subscription.
I can therefore very easily see that it’s only costing me ~3p per day to host my website. And over two thirds of this cost is for DNS hosting, so the cost to host and serve my website content is currently less than 1p per day.
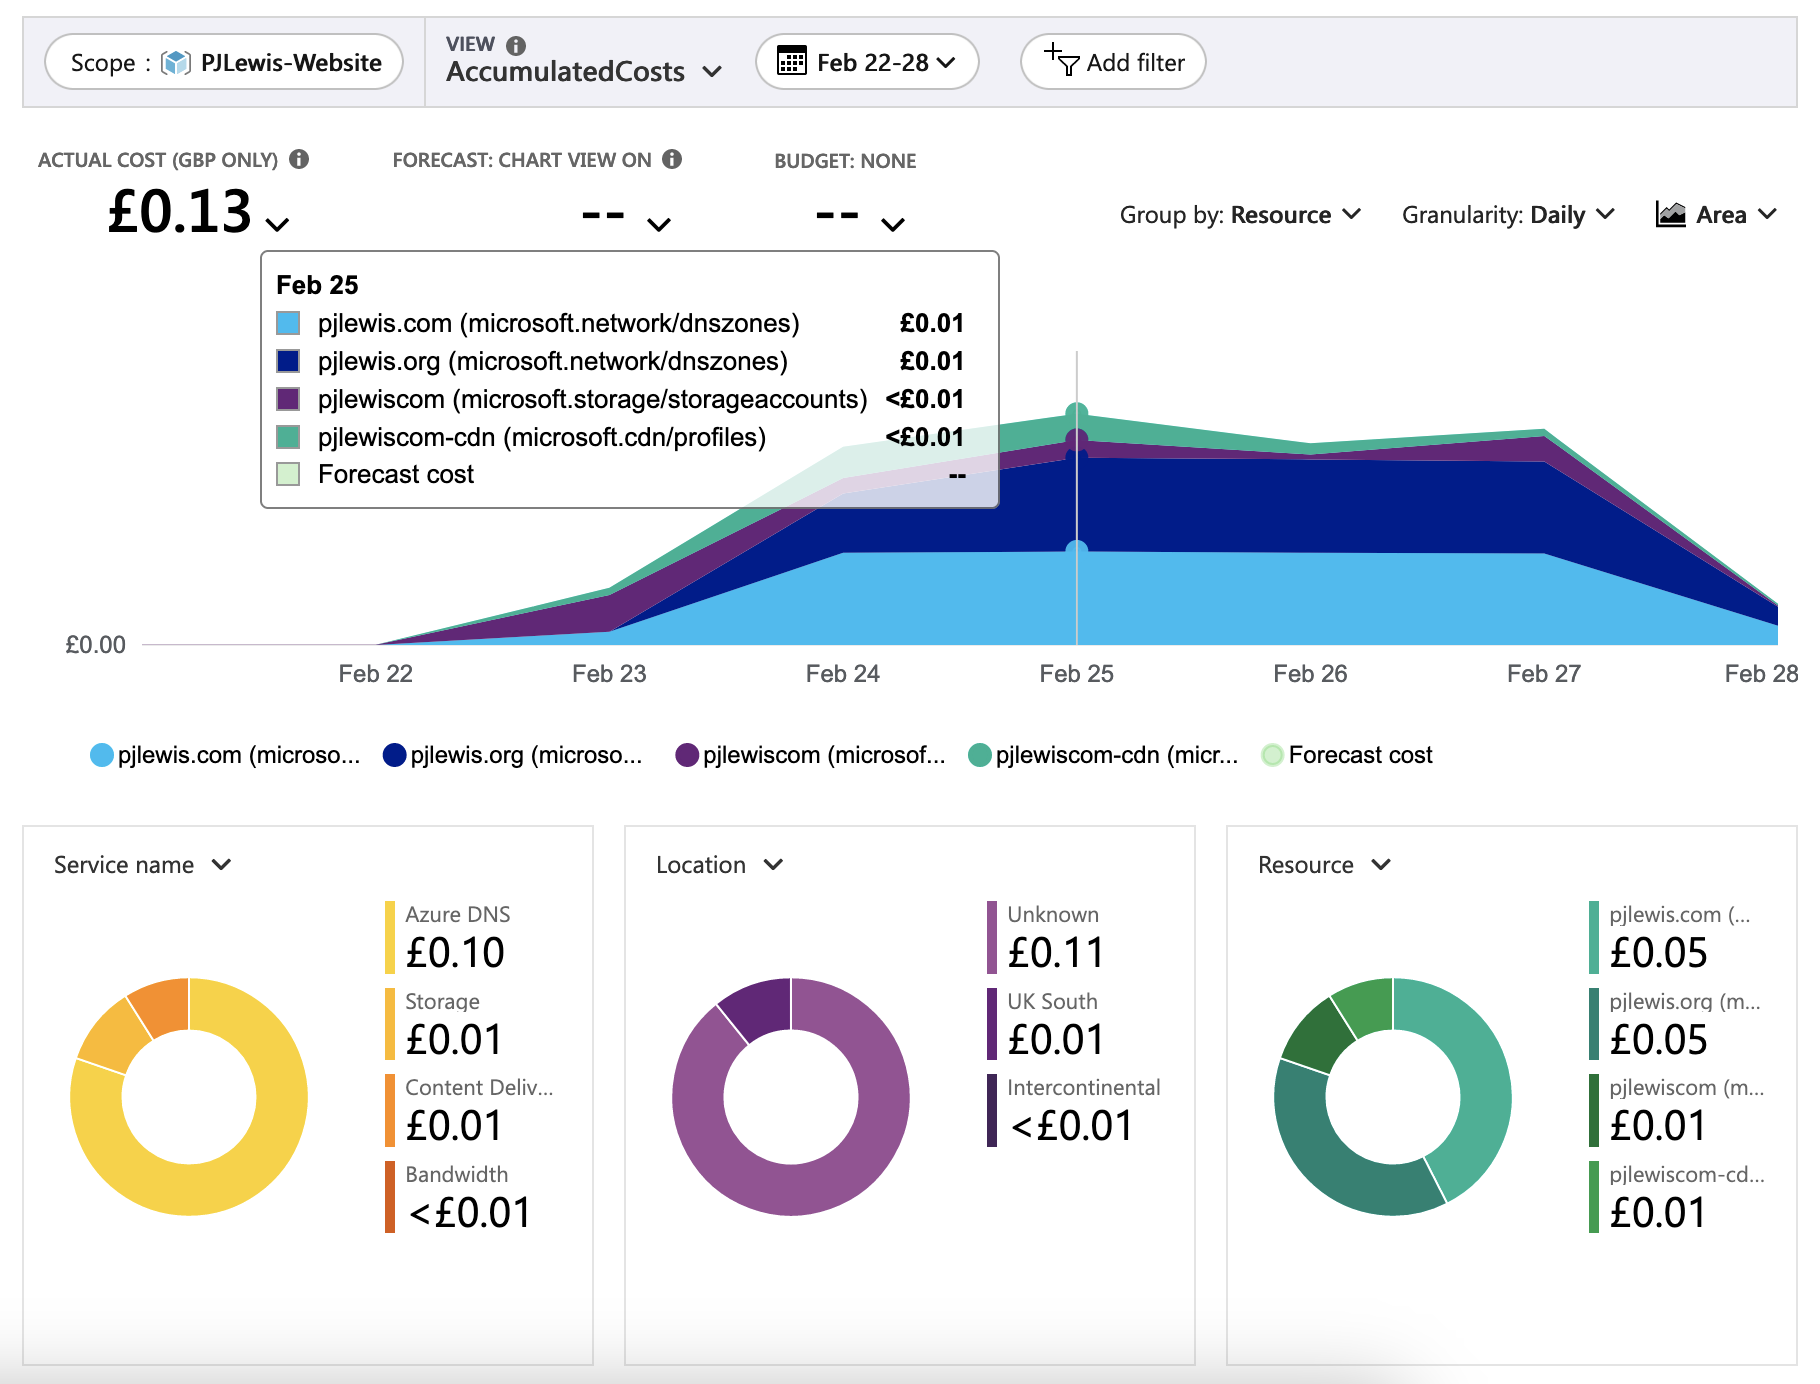
Even at 3p per day, it should cost less than £1 per month to host my site going forwards. In AWS, I was paying $1-2 per month for DNS hosting and CDN, plus a portion of the costs of running a VPS to host the WordPress installation (around £5 per month). Reducing my annual hosting costs to <£12 is a nice win.
Final thought: I’ve seen some discussions internally about colleagues moving from static web hosting on Azure blog storage to Azure Static Web Apps , so I will find some time to look into that in the near future!