14 minutes
Using AKS Backup to Backup and Restore Your Kubernetes Clusters
As the number of workloads running in your Kubernetes estate increases, the size and complexity of that estate will also necessarily increase. You will likely be running many workloads from multiple dev teams across numerous namespaces, and you may even be running these workloads across multiple clusters and regions.
Whilst the number of applications is few and the complexity is low, and assuming you’re not storing any persistent state in your cluster, it is fair to say that your Kubernetes YAML manifests can act as a good backup/restore or disaster recovery mechanism, as long as they are suitably version controlled so you can reliably deploy a specific version.
However, as the complexity grows, and depending how you deploy your apps into your cluster, you will reach a point where re-deploying all your apps from their respective manifest files is simply not feasible any more. In addition, if you are using Persistent Volumes to store persistent state in your containerised apps, you need to look at a “proper” backup solution for your Kubernetes cluster as a whole.
What is AKS Backup?
Back in November 2022, Azure announced the private preview of Azure Kubernetes Service (AKS) Backup - a feature that lets you backup and restore your containerised applications running in your AKS clusters, including any data stored on Persistent Volumes attached to the clusters. In March 2023, AKS Backup became available as a Public Preview , which means any Azure customer can now try it out.
AKS Backup is a whole-cluster backup solution built on top of the open source project Velero . It can back up an entire cluster, or can selectively back up resources based on criteria you define, such as namespaces or labels. It can back up daily, or multiple times per day (as frequently as 4 hours, currently). It can also restore an entire cluster or just part of it, customised by namespace or labels, and can include persistent volumes and other resources included in the backup.
The rest of this blog post will take a look at the capabilities of AKS Backup, and run through how to backup and restore some or all of your applications deployed into an AKS cluster.
Setting up AKS Backup
Before we can get started with AKS Backup, we need to create a Storage Account to store our backups in. I’d recommend creating this storage account in a different resource group to the one your AKS clusters are provisioned in, because this will allow you to:
- Control access to the backups separately to your clusters, and
- Manage the lifecycle of the storage account separately to your clusters (i.e. you won’t accidentally delete your backups along with your cluster!).
To create a new resource group, storage account, and storage container, issue the following commands using the Azure CLI:
az group create --location <your-preferred-region> --name <resource-group-name>
az storage account create --name <storage-account-name> --resource-group <resource-group-name>
az storage container create --name <aks-cluster-name> --account-name <storage-account-name>
Note that the storage account needs to be in the same region as the AKS cluster you are backing up.
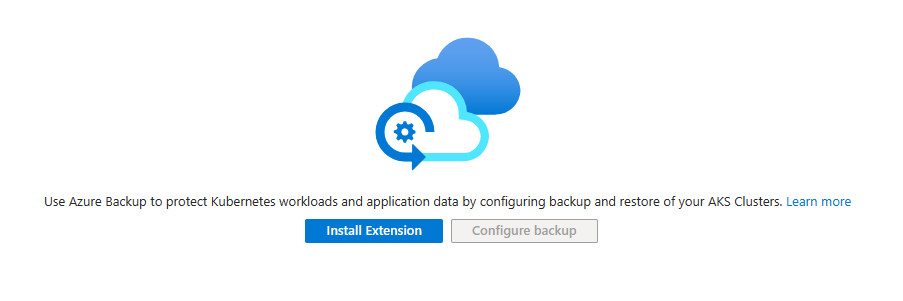
Once you have created the storage account and container, you need to install and configure the Backup Extension into the cluster you want to back up (the source cluster). This can be done from the AKS blade by navigating to “Backup (preview)” under “Settings” in the left menu:

Navigate to AKS Backup in the AKS portal
And then clicking the “Install Extension” button:
Install the AKS Backup Extension from the Azure portal
Alternatively, you can use the Azure CLI commands to install the backup extension , as well as manage other backup operations.
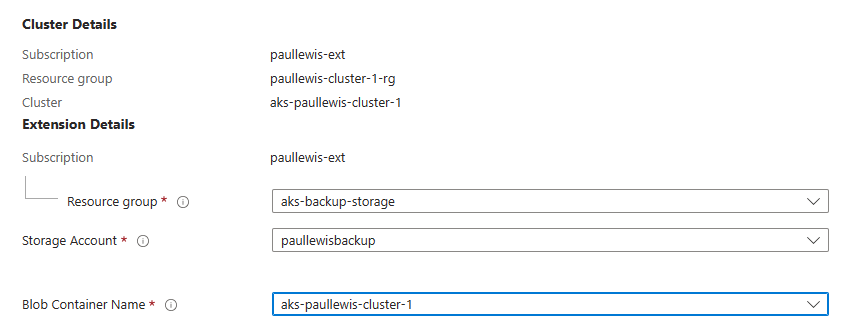
When installing the backup extension, you will need to provide the resource group, storage account, and container name to configure where you want your cluster backups to be stored:
Configuring the storage account and container name to store your AKS cluster backups in
If you watch your cluster while it is installing the backup extension, you will see a new dataprotection-microsoft get created, and then a number of pods will be scheduled within that namespace:
$ kubectl get pods -n dataprotection-microsoft
NAME                                                         READY   STATUS    RESTARTS        AGE
dataprotection-microsoft-controller-547bc5c49f-7qvqd         2/2     Running   0               4m38s
dataprotection-microsoft-geneva-service-547f778688-k96cw     2/2     Running   0               4m37s
dataprotection-microsoft-kubernetes-agent-5fb56df4bf-mtcxq   2/2     Running   2 (3m53s ago)   4m38s
Once the installation of the backup extension is complete, the “Backup (preview)” portal page will change, giving you the option to configure a new backup:
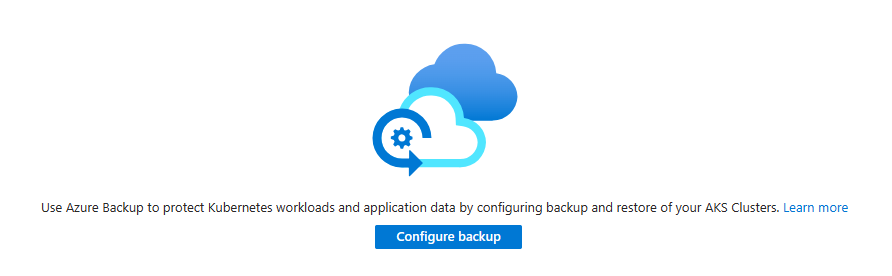
Click on "Configure backup" to start configuring a new backup job
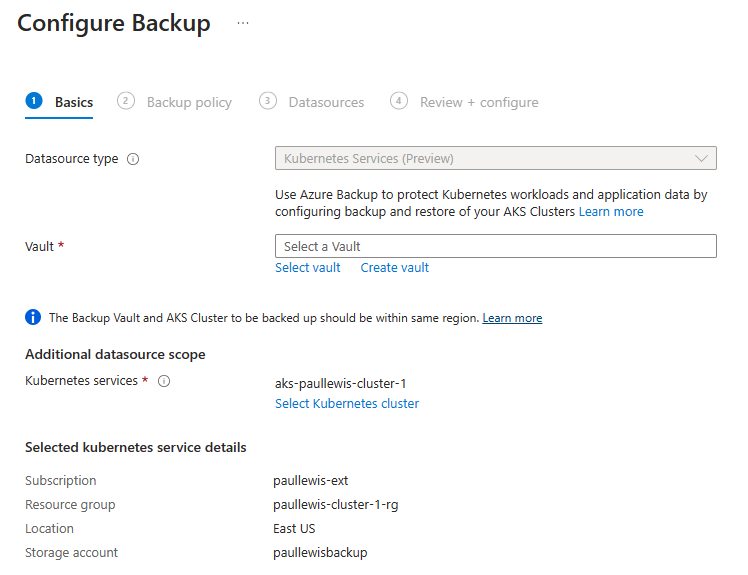
If we click on the “Configure backup” button, we are prompted to select a vault to use for the backups - if (like me) you don’t have one already, you can choose to create one here:
Select or create a new Backup Vault to store your backups in
As with the storage container name, I’m going to use the cluster name plus -whole to signify which cluster I’m backing up, and that I’m backing up the whole cluster. I also chose “Globally-redundant” backup storage redundancy, so that my backup data is replicated outside the region my cluster and backup vault are stored in:
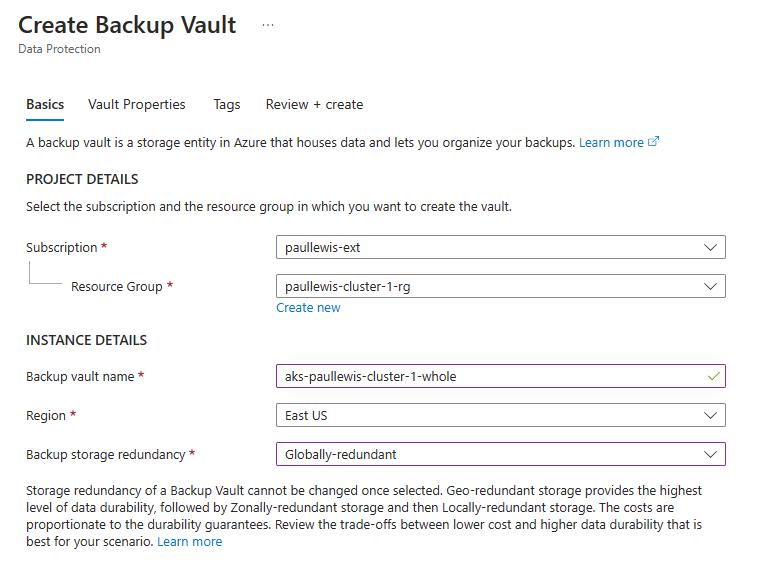
Define the properties for your new backup vault
The remaining default values are fine for most people, so click “Review + create” to create your vault.
If you get an error about Trusted Access and/or Role Permissions are missing for the selected cluster, go ahead and click on “Grant Permissions” to fix it:
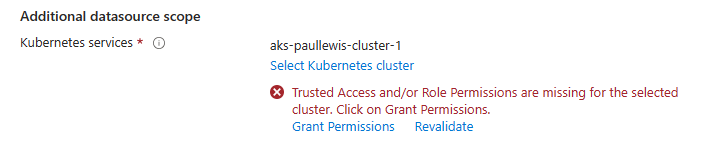
Click on "Grant Permissions" to fix this issue if you encounter it
This will take you back to the Configure Backup screen:
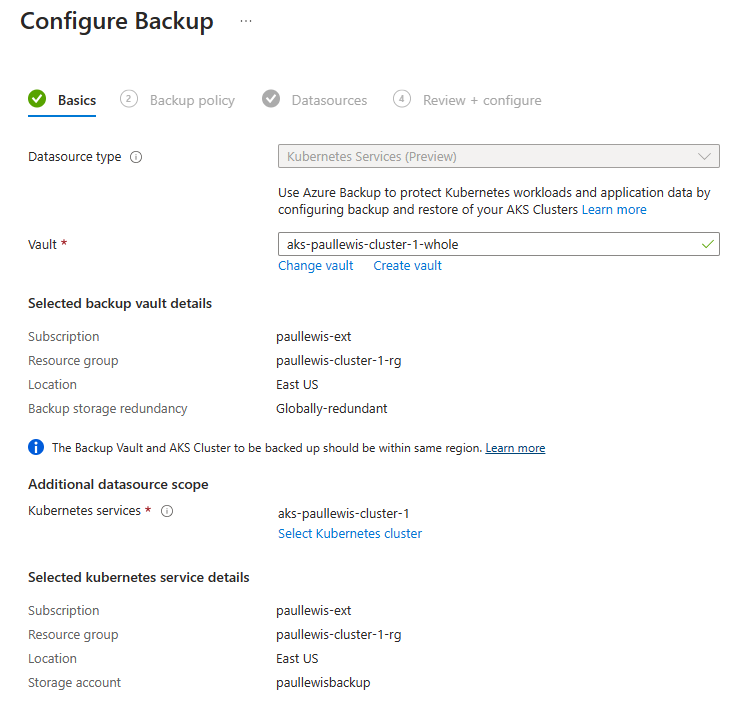
Review AKS backup configuration
On the next screen you will be asked to select or create a Backup policy:
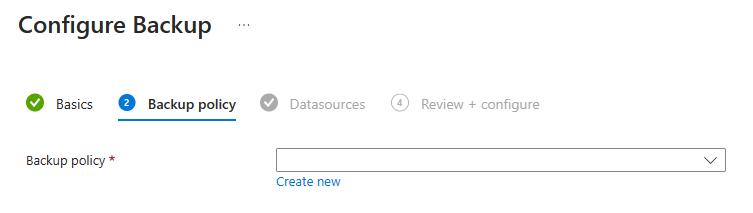
Select or create a new backup policy
I didn’t have any backup policies, so I went ahead and created a new one:
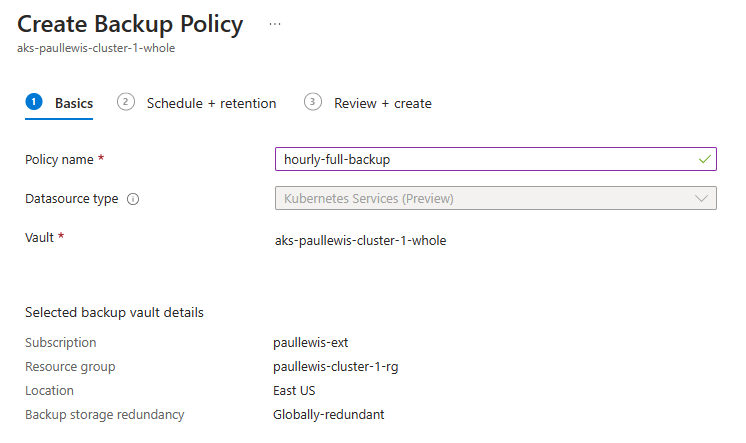
Configure a new Backup Policy
I then set the schedule and retention configuration:
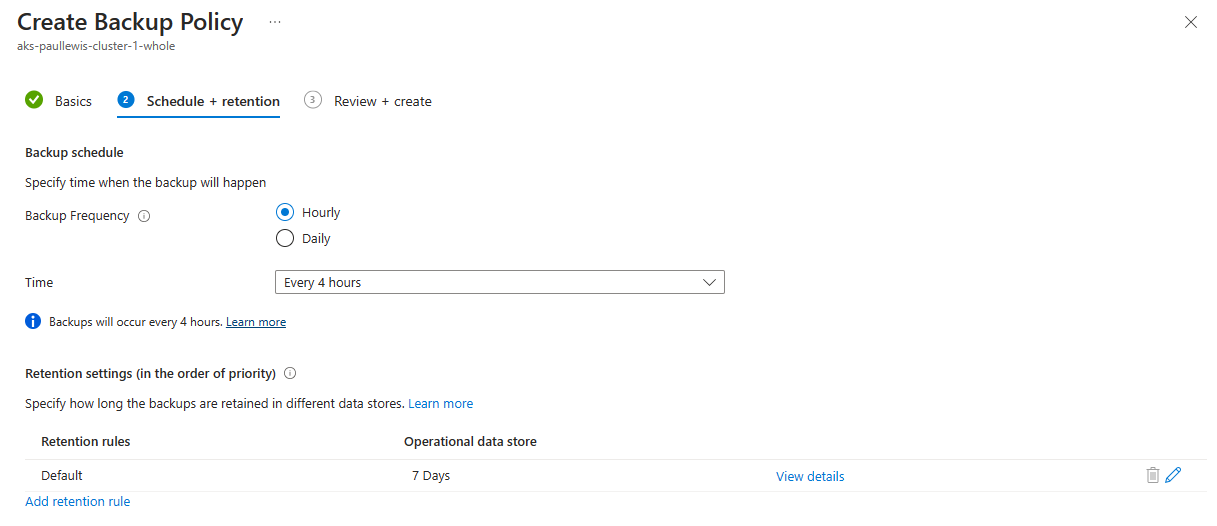
Set the schedule and retention settings for the Backup Policy
Add a datasource to your backup by clicking the “Add/Edit” button above the table, or the blue “Add” button at the bottom of the screen:
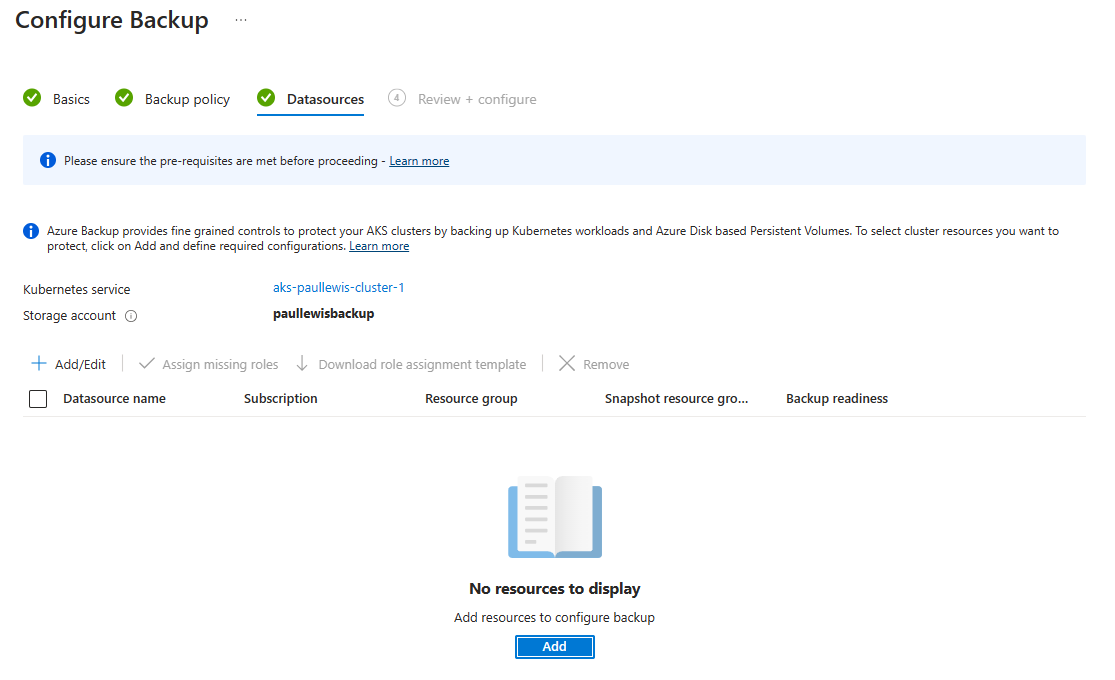
Add a datasource to your backup
Define a name for your backup instance, and select which namespaces to back up - or just select “All (including future Namespaces)”, which would be my recommendation. You can also optionally add labels to filter resources, and you can also selectively choose to backup or ignore the whole cluster scope, cluster secrets, and persistent volumes. The default settings here should be good for most people:
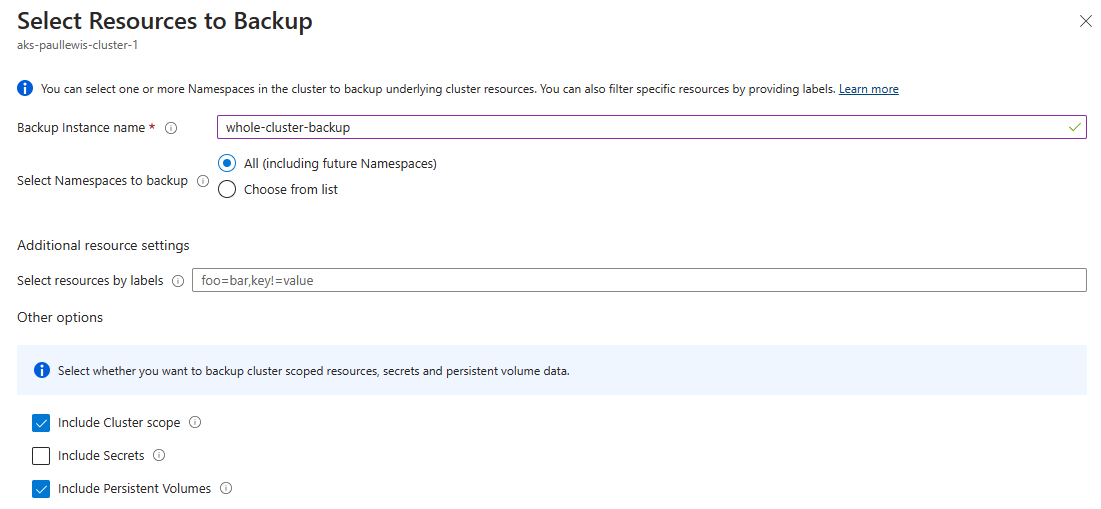
Select the resources to back up
You must then validate your chosen datasource configuration by clicking on the “Validate” button:
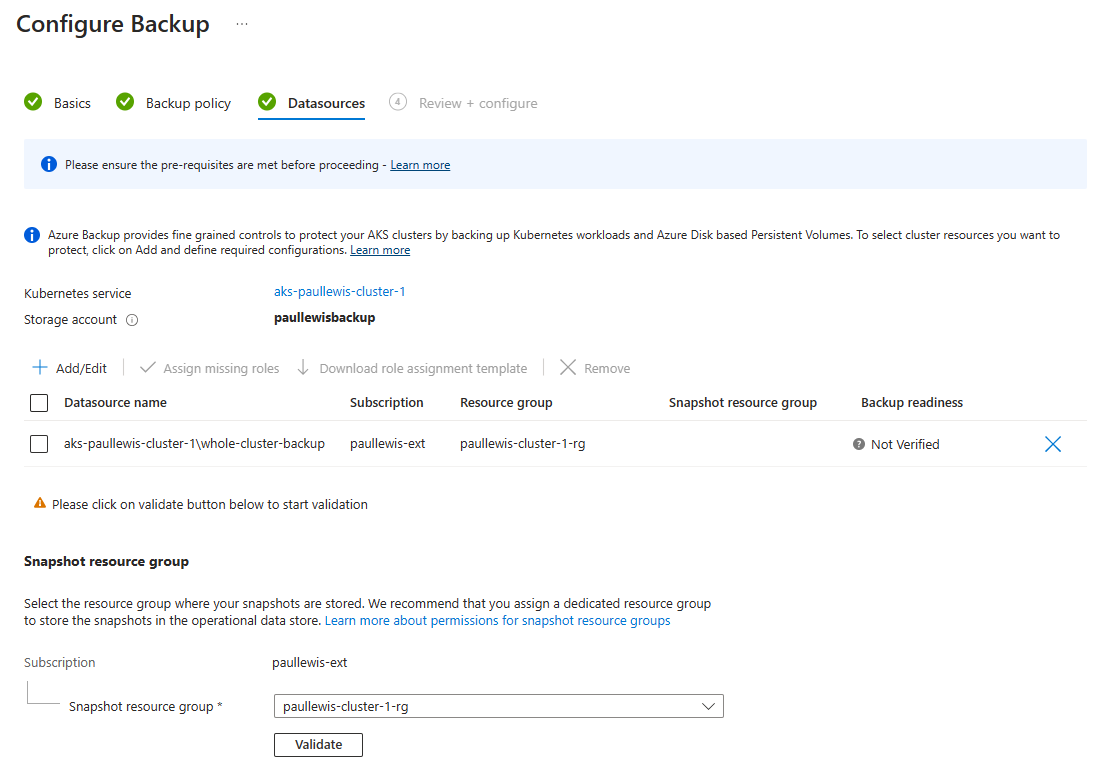
A new datasource configuration needs validation
I received a Role assignment not done error message during validation:

You may receive the Role assignment not done error message while validating your new datasource
But this was quickly addressed by selecting the datasource and clicking the “Assign missing roles” button:

Azure makes it easy to fix the issue by clicking the Assign missing roles button
A revalidate was automatically triggered by this process too, and within a couple of minutes my datasource was validated:

New datasource successfully validated
Finally we review and create the backup configuration:

Review and create the backup configuration
Immediately after configuration, the backup will be in the Configuring protection status, but after a few seconds this will change to Protection configure. After this, backups will start to be taken automatically on your defined schedule, or you can click the “Backup Now” button to manually start a backup:
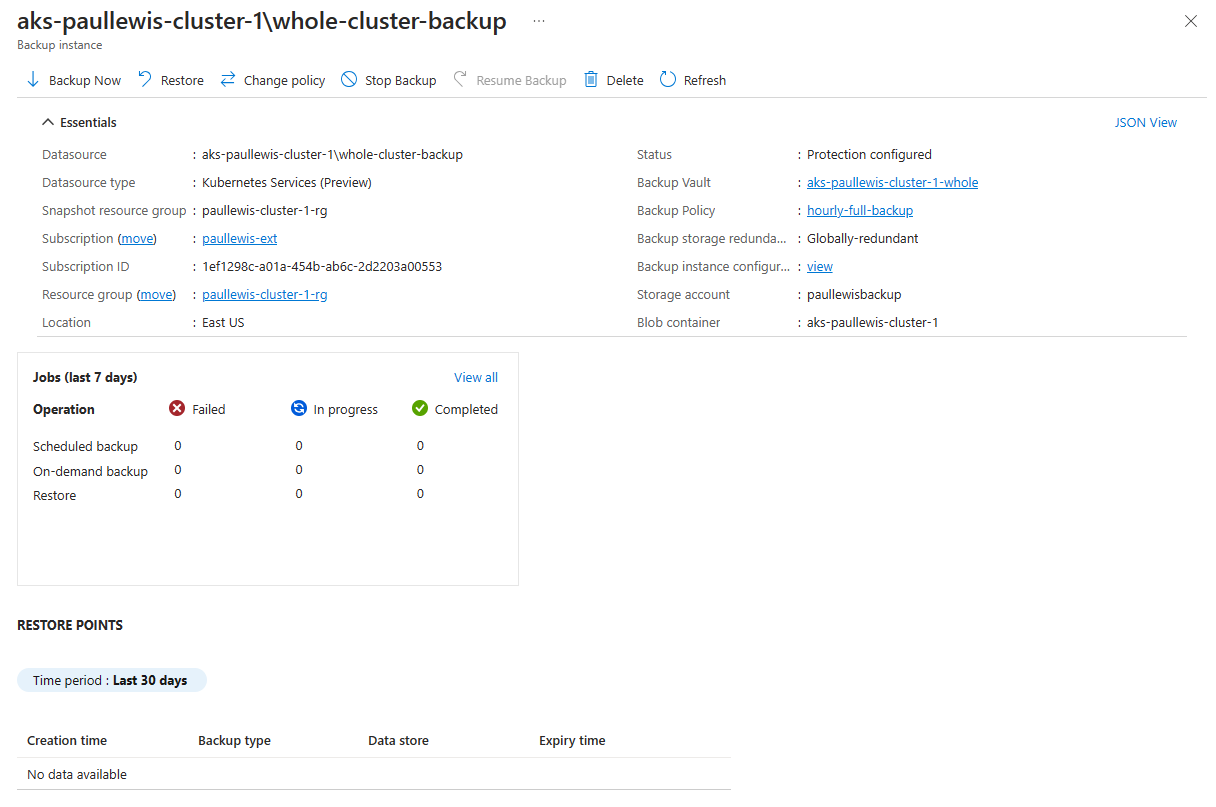
Overall status of your newly created backup configuration
Deploying and Backing Up a Test Workload
To demonstrate the “whole cluster” nature of AKS Backup, I will deploy two separate workloads, into separate namespaces. The first workload is a microservices demo by Weaveworks, and the second is a WordPress website.
Deploying the Weaveworks “Sock Shop” microservices demo is simple:
# Clone the repository
git clone https://github.com/microservices-demo/microservices-demo
# Change into the Kubernetes deployment directory:
cd microservices-demo/deploy/kubernetes
# Create a Kubernetes namespace:
kubectl create namespace sock-shop
# Deploy the microservices demo:
kubectl apply -f complete-demo.yaml
After a few minutes you will see all the service pods running in your cluster:
$ kubectl get pods -n sock-shop
NAME                            READY   STATUS    RESTARTS   AGE
carts-78d7c69cb8-8gdvh          1/1     Running   0          3m
carts-db-66c4569f54-hjd9h       1/1     Running   0          3m
catalogue-7dc9464f59-8pf5g      1/1     Running   0          3m
catalogue-db-669d5dbf48-br8vn   1/1     Running   0          3m
front-end-7d89d49d6b-276rd      1/1     Running   0          3m
orders-6697b9d66d-mdmt5         1/1     Running   0          3m
orders-db-7fd77d9556-vncxm      1/1     Running   0          3m
payment-ff86cd6f8-n59h5         1/1     Running   0          3m
queue-master-747c9f9cf9-gdzrt   1/1     Running   0          3m
rabbitmq-6c7dfd98f6-ngdjc       2/2     Running   0          3m
session-db-6747f74f56-zfj4d     1/1     Running   0          3m
shipping-74586cc59d-7gwd4       1/1     Running   0          3m
user-5b695f9cbd-c4xnv           1/1     Running   0          3m
user-db-bcc86b99d-ct4l6         1/1     Running   0          3m
Along with Kubernetes services for each microservice:
$ kubectl get svc -n sock-shop
NAME           TYPE        CLUSTER-IP       EXTERNAL-IP   PORT(S)             AGE
carts          ClusterIP   172.10.126.127   <none>        80/TCP              3m
carts-db       ClusterIP   172.10.189.16    <none>        27017/TCP           3m
catalogue      ClusterIP   172.10.10.21     <none>        80/TCP              3m
catalogue-db   ClusterIP   172.10.21.234    <none>        3306/TCP            3m
front-end      NodePort    172.10.254.118   <none>        80:30001/TCP        3m
orders         ClusterIP   172.10.190.120   <none>        80/TCP              3m
orders-db      ClusterIP   172.10.8.210     <none>        27017/TCP           3m
payment        ClusterIP   172.10.220.208   <none>        80/TCP              3m
queue-master   ClusterIP   172.10.145.95    <none>        80/TCP              3m
rabbitmq       ClusterIP   172.10.32.208    <none>        5672/TCP,9090/TCP   3m
session-db     ClusterIP   172.10.146.226   <none>        6379/TCP            3m
shipping       ClusterIP   172.10.139.72    <none>        80/TCP              3m
user           ClusterIP   172.10.102.43    <none>        80/TCP              3m
user-db        ClusterIP   172.10.114.154   <none>        27017/TCP           3m
Deploying WordPress from a Helm chart is equally simple:
$ kubectl create namespace wordpress-app
$ helm repo add azure-marketplace https://marketplace.azurecr.io/helm/v1/repo
$ helm install my-wordpress-site azure-marketplace/wordpress -n wordpress-app
Once deployed, Helm will provide some output telling you how to access your WordPress instance, and very soon after you’ll see a couple of pods, one running WordPress, and one running MariaDB:
$ kubectl get pods -n wordpress-app
NAME                                 READY   STATUS    RESTARTS   AGE
my-wordpress-site-6dc78c8855-gwknl   1/1     Running   0          2m
my-wordpress-site-mariadb-0          1/1     Running   0          2m
After installing WordPress, I quickly made a few changes to the site’s title, tagline, and homepage:
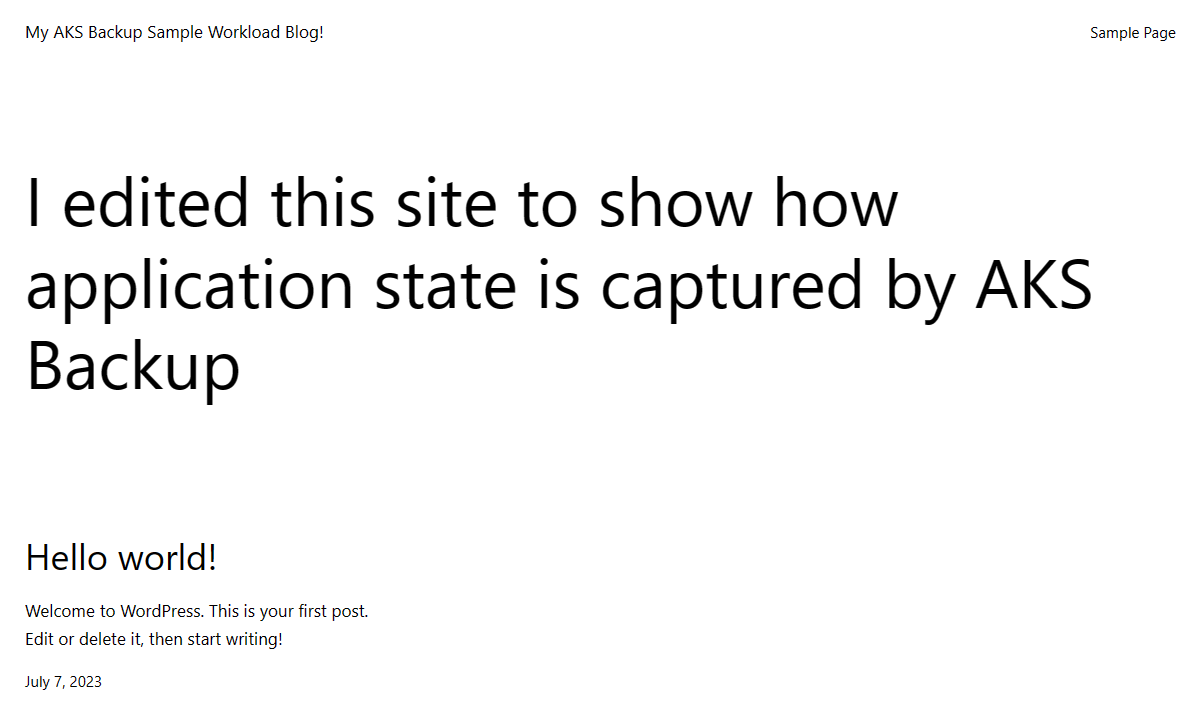
I made a few modifications to the default WordPress homepage to show state being captured by the backups
I then went back to the AKS blade in the Azure portal, and manually started a backup by clicking the “Backup Now” button:

Click the "Backup Now" button to start a manual backup immediately
While the backup is running, you’ll see an On-demand backup is In progress:
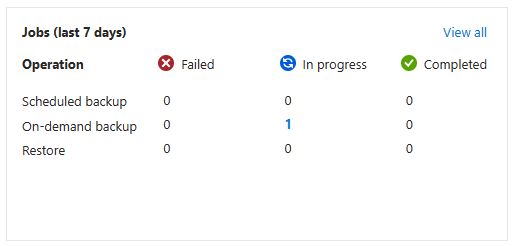
On-demand backup job in progress
After a few minutes the backup will complete and the status will update:
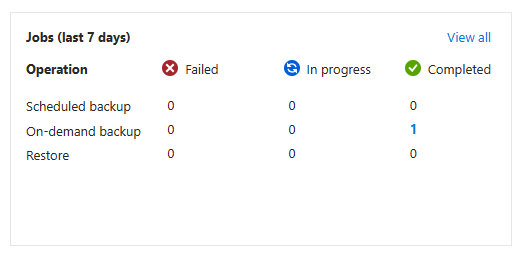
On-demand backup has completed
You can click on the “1” under “Completed” to see more details about the backup that just ran:

Details of the on-demand backup job that just ran
Restoring a Backup into Another Cluster
Now that we have a couple of sample workloads in our first AKS cluster, and a successful backup of that cluster, we can look at how we restore our backup to another cluster.
As per the AKS Backup documentation :
AKS backup allows you to restore to [the] original AKS cluster (that was backed up) and to an alternate AKS cluster. AKS backup allows you to perform a full restore and item-level restore. You can utilize restore configurations to define parameters based on the cluster resources that will be picked up during the restore.
This means that when we need to restore from backup, we have multiple options to help meet our business needs:
- We can restore back to the original cluster, or to a different cluster
- We can restore the backup in its entirety, or selectively restore specific items (such as namespaces, services, deployments, etc.)
To prepare for the restoration, the backup extension needs to be running in the target cluster. If this is the same cluster the backup was taken from, then no further action is required. If this is a different cluster, you will need to install the extension, in exactly the same way we did above .
The main difference when installing the backup extension on the target cluster is that you should create a storage container with the name of the target cluster, rather than the source cluster.
Partial Restore of Specific Resources
The examples we will be working through in the remainder of this blog post will cover restoring a backup to an alternative cluster. Once you have created the target cluster, you can check that our demo workloads are not deployed into the cluster:
$ kubectl get ns
NAME                       STATUS   AGE
calico-system              Active   18h
dataprotection-microsoft   Active   3m36s
default                    Active   18h
gatekeeper-system          Active   18h
kube-node-lease            Active   18h
kube-public                Active   18h
kube-system                Active   18h
tigera-operator            Active   18h
There are two ways to initiate the restore itself: through the AKS blade, or from the Backup center blade. The AKS blade is easier if you’re restoring to the same cluster you backed up from, but you will have to configure a backup on the target cluster before you’re able to start the restore process, so starting the restore from the Backup center blade will be quicker.
To start your restore to a different cluster, navigate to the Backup center portal, then to “Backup instances” in the left menu, and select your cluster from the table:
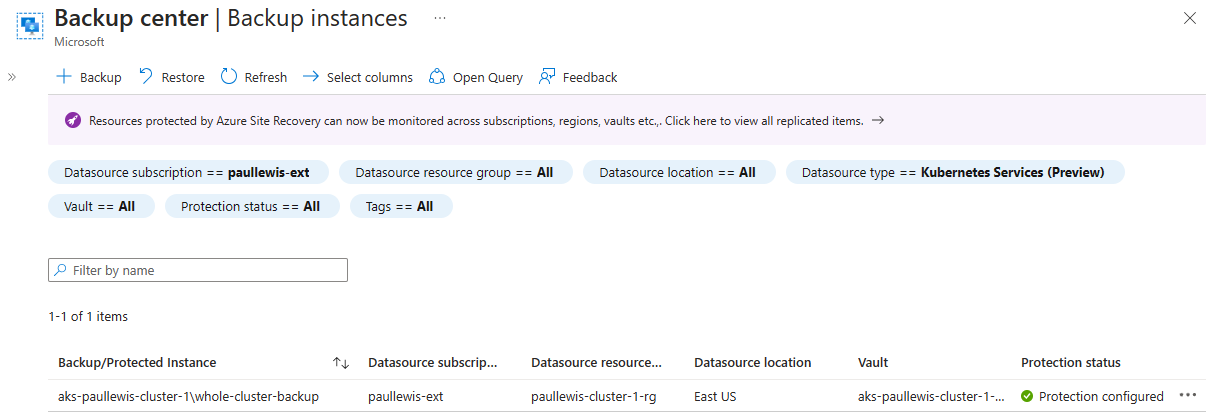
View the cluster backup instances in Backup center
On the next page, click on the “Restore” button at the top of the page:
Start a restore operation by clicking the Restore button
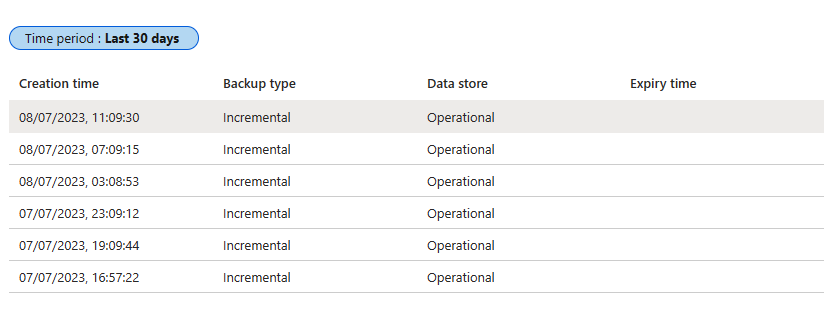
Select the Restore Point you want to restore into the target cluster - this will usually be the latest backup, but you may want to select an alternative if you’re restoring something that’s been accidentally deleted:
Choose your restore point from the list of available backups
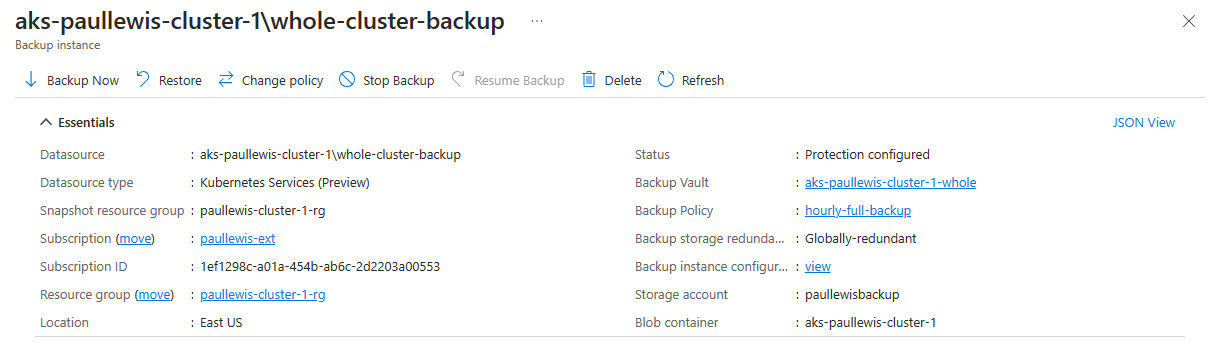
Select the cluster you want to restore the backup into, in my case the backup came from aks-paullewis-cluster-1 and I’m restoring into aks-paullewis-cluster-2:
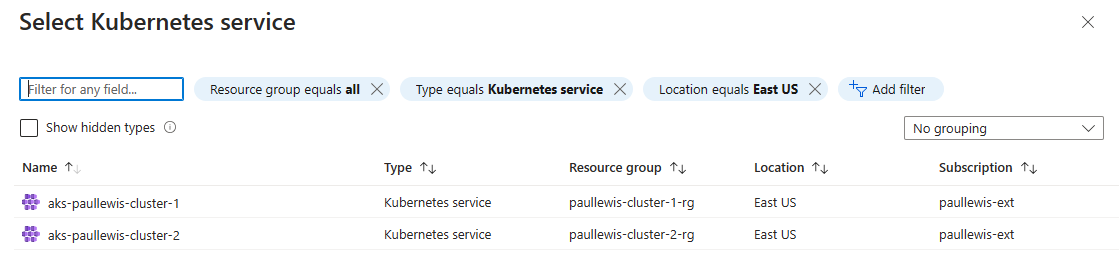
Select the AKS cluster to restore your backup into
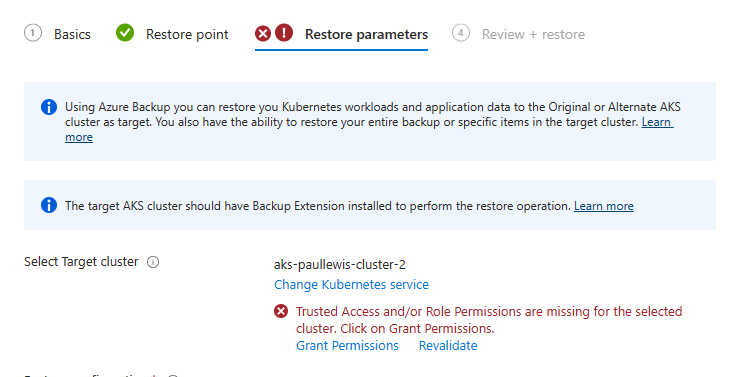
You need to validate the restore parameters before you can proceed, so go ahead and click the “Validate” button. You will probably get an error message saying Trust Access and/or Role Permissions are missing for the selected cluster, but fortunately the AKS portal can resolve this for us, just click on “Grant Permissions”:
Validate the restore configuration, and grant additional permissions as prompted
Once the permissions have been added and validated, you can proceed to the next step. But before we do that, let’s change the Restore configuration, and select to only restore the wordpress-app namespace and resources (you will need to Validate your restore configuration again after making this change):
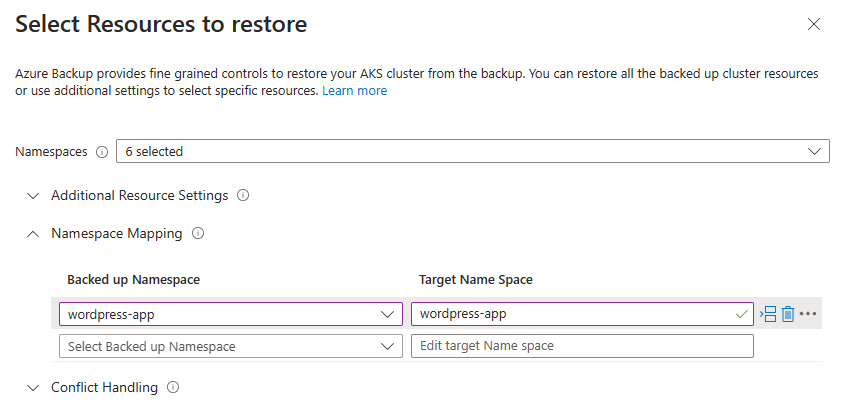
Select the namespace(s) you wish to restore, providing a Target Name Space name for each namespace chosen
If you wish to, you can change the name of the Target Name Space here, which will restore the backup to a different namespace - this can be useful if you want to restore a backup alongside the original workload in the source cluster.
Once validated again, click on the Next: Review + restore button and then the Restore button to start your restore. After a few seconds, you will see a Restore job In progress reflected in the jobs list:

Restore job in progress
The restore will take a few minutes, although you can watch the progress of the backup from within your cluster:
$ kubectl get all -n wordpress-app
NAME                                     READY   STATUS    RESTARTS   AGE
pod/my-wordpress-site-6dc78c8855-gwknl   1/1     Running   0          2m
pod/my-wordpress-site-mariadb-0          1/1     Running   0          2m

NAME                                TYPE           CLUSTER-IP      EXTERNAL-IP    PORT(S)                      AGE
service/my-wordpress-site           LoadBalancer   172.10.24.189   4.236.208.34   80:30352/TCP,443:32325/TCP   113s
service/my-wordpress-site-mariadb   ClusterIP      172.10.192.11   <none>         3306/TCP                     113s

NAME                                READY   UP-TO-DATE   AVAILABLE   AGE
deployment.apps/my-wordpress-site   1/1     1            1           76s

NAME                                           DESIRED   CURRENT   READY   AGE
replicaset.apps/my-wordpress-site-6dc78c8855   1         1         1       117s

NAME                                         READY   AGE
statefulset.apps/my-wordpress-site-mariadb   1/1     65s
If you point your browser at the EXTERNAL-IP for the my-wordpress-site service, you will see the same, edited WordPress homepage that we created earlier:
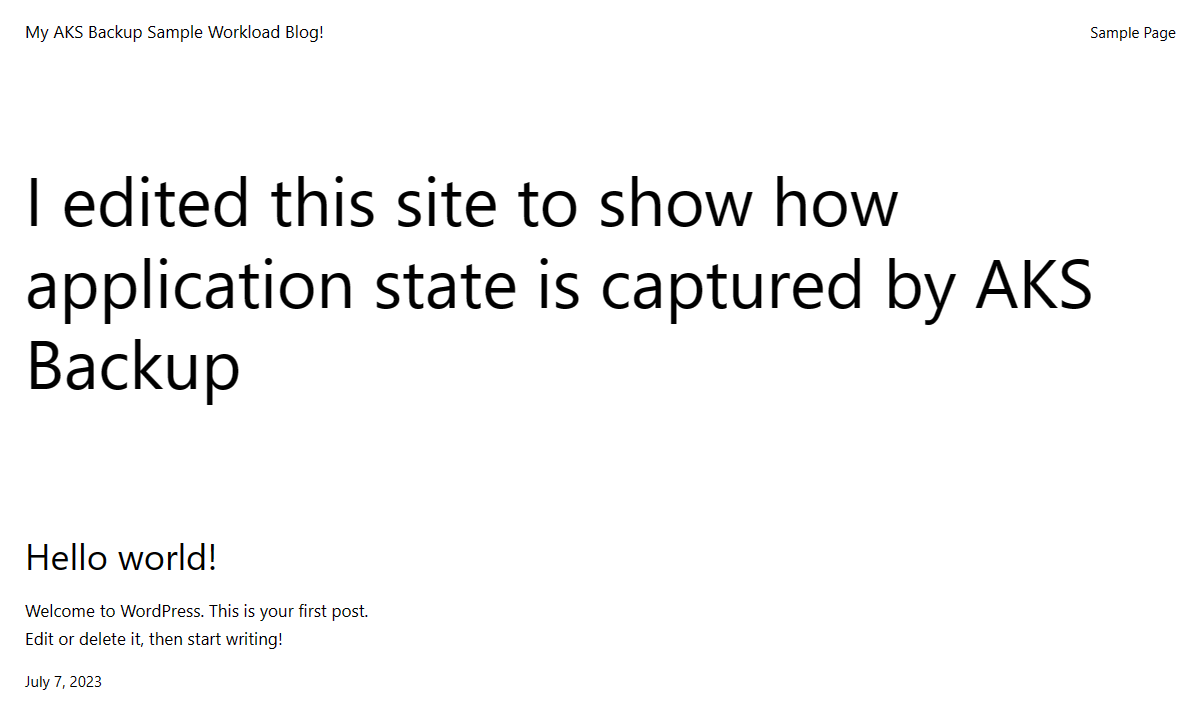
Viewing my modified WordPress homepage after restoring from backup onto a different cluster
We can also log in to the WordPress admin dashboard using the same credentials from our installation in the source cluster.
Full Cluster Restore
If we want to restore everything from our cluster backup into the target cluster, we can perform a full cluster restore. The process is very similar, but when setting the Restore parameters, you leave the Restore configuration on the default setting, which is All selected.
As before, we can monitor the progress of the restore from within our cluster, and see our namespaces being restored:
$ k get namespace
NAME                       STATUS   AGE
calico-system              Active   2h
dataprotection-microsoft   Active   2h
default                    Active   2h
gatekeeper-system          Active   2h
kube-node-lease            Active   2h
kube-public                Active   2h
kube-system                Active   2h
sock-shop                  Active   6m
tigera-operator            Active   2h
wordpress-app              Active   6m
And again, we can look up the EXTERNAL-IP for the my-wordpress-site, and then browse to that IP address to see our modified WordPress homepage.
Conclusion
With AKS Backup, Azure has taken the best-of-breed Kubernetes backup solution Velero , integrated it with the Azure portal and CLI, and made it straightforward to install it into your cluster and to manage your backups.
You can easily configure which components in your cluster should be backed up (and which shouldn’t!), how frequently they should be backed up, and how long those backups should be retained. You can even create multiple backup configurations to meet different business requirements. And of course, persistent volumes can also be included in your backups, so any state within your apps is also backed up.
This provides great peace of mind for customers who are looking for a simple but effective backup strategy in the new world of Kubernetes. Keep an eye on the Azure Updates for Containers page so you don’t miss AKS Backup going GA!